
The Ultimate Construction Waste Management Checklist for Burlington Builders
- Karan Chawla
.jpg/v1/fill/w_320,h_320/file.jpg)
- Jan 12
- 5 min read

Summary
Clear steps to help Burlington builders plan and execute construction waste management efficiently.
How to rent a bin Burlington and choose the right bin sizes for different types of construction debris.
Practical tips on reducing waste, avoiding extra costs, and staying compliant with local disposal best practices.
Effective waste management is a cornerstone of any construction project. For builders in Burlington, planning how to handle construction debris not only ensures a safer and cleaner site but also helps manage costs and avoid unnecessary delays. Whether you’re working on a small renovation or a large build, having the right strategy in place is essential.
This guide will walk you through a construction waste management checklist designed specifically for Burlington builders. It includes actionable steps for organizing waste streams, choosing the right disposal bins, optimizing bin rentals, and minimizing overall waste disposal costs — all while ensuring a safe and efficient job site.
Why Construction Waste Management Matters for Burlington Builders
Construction sites generate a variety of debris types, including wood, drywall, concrete, metals, and packaging materials. Without a structured approach to waste management, teams can face:
Increased project costs due to inefficient disposal
Safety hazards from cluttered workspaces
Delays due to poorly planned waste logistics
Fines or compliance issues from improper disposal
A properly organized waste management plan helps you prevent these problems and allows your team to focus on delivering quality work efficiently.
Step 1: Conduct a Waste Assessment Before Work Begins
Before ordering bins or organizing pickup schedules, start with a waste assessment. This step helps you estimate:
Types of waste you will generate
Amount of each waste type
Project timeline and peak debris periods
For example, roofing and demolition phases produce a high volume of heavy materials like shingles and concrete, while interior renovations may generate more drywall and wood.
By understanding the volume and types of debris before work begins, you can choose the right bin sizes and avoid renting multiple bins unnecessarily.
Step 2: Choose the Right Bins for Your Waste Types
One of the most important decisions in your waste management plan is bin selection. For Burlington builders, renting a bin is a flexible and cost-effective solution.
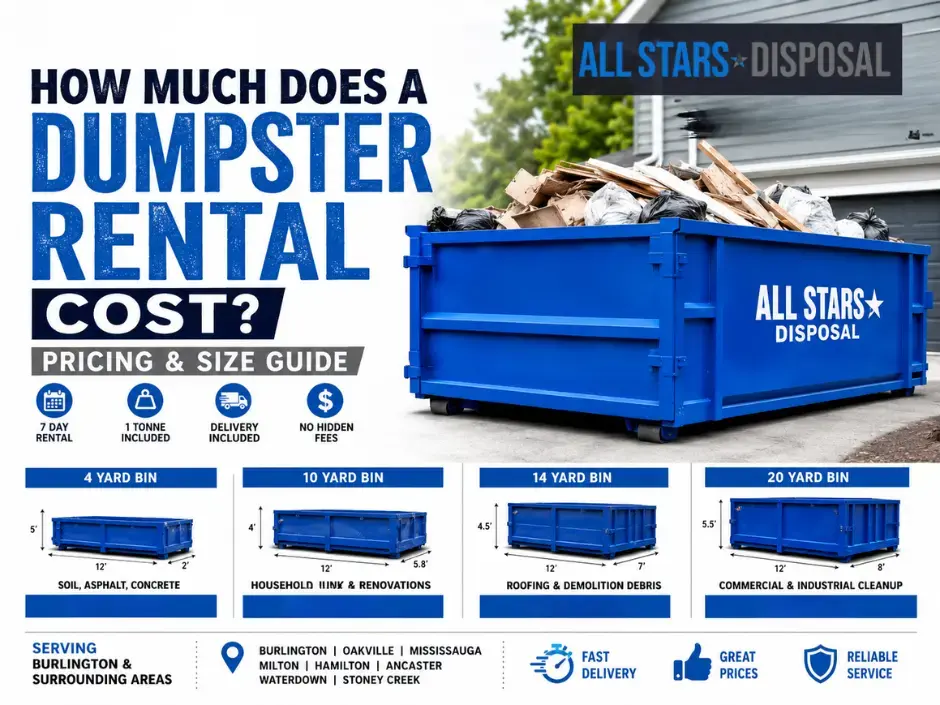
Here’s a quick breakdown of common bin sizes and when to use them:
4-Yard Bin — Small or Specialized Waste
Best for small jobs or tight spaces
Suitable for light debris, small amounts of wood, or packaging materials
Ideal for final cleanups or specialty waste streams
10-Yard Bin — General Construction Waste
Great for everyday construction debris
Works well for medium-sized renovation projects
Perfect for drywall, wood, and miscellaneous general construction debris
14-Yard Bin — Larger Debris Loads
Good for bigger material quantities
Ideal for framing waste, flooring removal, or larger remodels
Reduces the need for frequent disposal runs
20-Yard Bin — High Volume Projects
Best for large builds and demolition waste
Suitable for concrete, brick, siding, or project sites with multiple trades
Helps avoid multiple bin rentals by providing ample space
Choosing the right bin size helps you rent a bin Burlington efficiently, minimizes extra fees, and keeps your site organized.
Step 3: Plan Bin Placement for Maximum Efficiency
Once you’ve selected bins, planning their placement on site is critical. Consider the following:
Accessibility: Place bins where workers can easily deposit debris without obstructing workflow.
Safety: Ensure bin locations don’t block exits or emergency access.
Space: Avoid interfering with equipment staging areas or vehicle movement paths.
Well-placed bins lower the risk of accidents and help workers stay productive throughout the project.
Step 4: Establish Waste Sorting Procedures
Sorting waste at the point of disposal can reduce overall costs and make recycling easier. Create a system that separates:
Wood and lumber
Drywall and gypsum
Metals
Concrete and masonry
Yard or landscaping debris
Hazardous materials (handled separately)
Using labeled areas or color-coded bins helps crews sort effectively. This not only keeps landfill waste down but can also improve recycling rates, lowering disposal costs and supporting sustainability goals.
Step 5: Schedule Bin Deliveries and Pickups Efficiently
Knowing when to place and remove bins is as important as knowing which bins to rent. Coordinate deliveries based on:
Project phases
Peak debris generation times
Contractor schedules
For instance, ordering a bin too early can lead to rental fees before it’s needed, while ordering too late can slow down work.
Good scheduling ensures bins are available exactly when needed and removed promptly once filled.
Step 6: Control Weight and Avoid Overages
Construction debris can be unexpectedly heavy, especially with materials like concrete, brick, or tile. Most standard bin rentals include a weight limit within the base price. Exceeding this limit can lead to costly weight-overage fees.
To avoid extra charges:
Plan for heavy debris separately and choose larger bins if necessary
Distribute heavy materials evenly across bins to avoid overloading
Track how quickly bins are filling and adjust your plan if needed
Monitoring weight usage helps builders avoid surprise charges and keeps projects on budget.
Step 7: Train Your Crew on Waste Protocols
An often-overlooked part of construction waste management is crew awareness. Make sure workers know:
Where each bin is located
What materials go into each bin
How to avoid contamination with prohibited items
Who to notify if a bin is full
Simple training or reminders during toolbox talks can help enforce waste-sorting rules and keep your site running smoothly.
Step 8: Review and Improve Waste Practices
No waste management plan should be static. At key project milestones or completions, review:
Whether your bins were the right sizes
If scheduling met your needs
Which materials caused the most issues
How well crews followed sorting protocols
Use this feedback to improve future projects and reduce waste costs over time.
Conclusion
A comprehensive construction waste management plan helps Burlington builders stay organized, improve safety, reduce disposal costs, and avoid unnecessary delays. By assessing waste ahead of time, choosing the right bins, planning placement, and training crews on proper procedures, you can optimize waste disposal and keep projects on track.
Implementing this construction waste management checklist supports smarter decision-making, better budgeting, and enhanced site efficiency — all while delivering high-quality results for your clients.
Frequently Asked Questions
1. What is the best bin size for construction waste?
Bin size depends on the scope of your project. Small renovations may require a 10-yard bin, while larger demolition or build projects may need 14- or 20-yard bins.
2. When should I schedule bin delivery?
Arrange delivery just before major debris is expected, such as after demolition or framing, to avoid paying rental fees before it’s needed.
3. How can I avoid weight overage fees?
Plan for heavy debris separately and use larger bins for materials like concrete or brick. Distribute weight evenly and monitor fill levels as work progresses.
4. Can construction waste be recycled?
Yes. Many materials like metal, wood, and concrete can be recycled if separated properly. Sorting on site improves recycling rates and lowers landfill waste.
Do I need permits for construction bin placement?
Permits are usually not needed if bins are placed on private property. If you plan to place a bin on the street, check local regulations for permit requirements.


Comments